Time to read: 6 min
In the product design world, it’s common to use a tool called a Failure Modes and Effects Analysis (FMEA) to improve a design or process.
FMEAs are commonly separated into two different categories, depending on their application:
A Design FMEA (D-FMEA) is used in product design to identify possible design weaknesses and failure modes. A Process FMEA (P-FMEA) is used to identify possible failures in the process that the item must go through to be completed, such as a machining operation, or transportation from one operation to the next.
In my experience, I have used a separate FMEA template for each respective category. This article will use a D-FMEA as an example of how to use this type of analysis in your product development cycles. Note that this template is a simplified version, compared to what’s common in the corporate world, and is a great starting place for you to build upon.
Download our Failure Modes and Effects Analysis Template
Details of our FMEA
As I mentioned earlier, the FMEA is a tool that is intended to identify weaknesses and problems before they occur. The FMEA accomplishes this by breaking an assembly down, often to the component level, and identifying all possible failure modes that we can think of. The image below shows what our lightweight D-FMEA looks like.

Each component of the D-FMEA is defined as follows:
- Item – The part or item for which we will begin to identify failure modes. It may be the subassembly level, discrete components, or both.
- Failure Mode – The specific manner or mode in which the failure occurs.
- Failure Effects – The consequences or result of a failure occurring.
- Severity – A severity value is assigned to the failure effect to quantify how much of a negative impact the failure mode will have if it occurs.
- Potential Causes – The potential causes are pretty self-explanatory. This area identifies the potential causes that may lead to the failure occurring.
- Occurrence – The occurrence value defines the probability of the cause happening. It is sometimes named probability in the header, instead of occurrence.
- Current Controls – The current monitoring, test or prevention scheme in place to prevent the failure mode from happening.
- Detectability – The detectability quantifies our ability to catch the failure mode before it happens, based on the current controls.
- Risk Priority Number (RPN) – The RPN is the product of the three rating categories to help sort the highest risks from the lowest.
In our FMEA, we have left out some of the categories that you will see in more elaborate FMEAs. These exclusions can be added in by the user if they feel they are necessary; for example, if there is a need to track actions to reduce the RPN within the FMEA, if larger teams are using the tool, or if there’s a need for customer reporting requirements and traceability between failure modes and action items. There may be a variety of other reasons to expand on the lightweight FMEA not mentioned here.
How to Set Up an FMEA
Setting up an FMEA is not difficult, but it will require some thought before we begin to analyze the design for failure modes. The first thing we need to do is define the ratings for each category. This will include definitions for Severity, Occurrence, and Detectability levels. In the example for this article, we have defined these category ratings as follows:
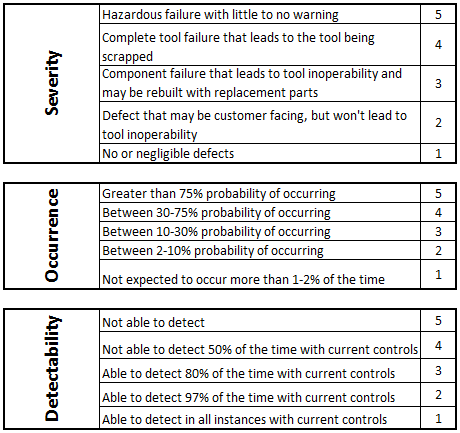
The rating criteria may be changed for each project and will rarely be the same from one company to the next. Regardless of your specific descriptors, it is important that all participants and stakeholders understand and agree to the rating criteria.
How to Complete a D-FMEA
Now that we have the D-FMEA set up, we are ready to begin completing the document. In this section, we’re going to work through an example using a ratchet drive. The image below is the patent artwork for a common ratchet that has item callouts for the Pawl (7), Ratchet Wheel (8), Detent (62, 63 and 64), and the Ratchet Main Body (6).

These are the items that we will define in our FMEA under the “Item” column as shown below (normally, we’ll list them one at a time because it prevents us from having to move cells around too much):

The detent could have been broken into more components, but for this example, there was little value in doing so. The next step is to begin identifying the failure modes that we believe may occur.
My preference is to complete the FMEA from left to right for each item, and then move down to the next item and repeat. That means we will finish the Ratchet wheel first, as indicated below.

We can see that in some cases, it’s possible to have multiple effects for each mode, such as the Ratchet Wheel and Pawl. We also see that the severity of these effects is closely related to the cause. As an example, losing the ability to transfer torque is a lot worse when it is sudden, as a result of teeth shearing, than it is when the teeth never mate well enough to transfer torque in the first place.
It’s also important to note that the two causes will have different occurrences because it is more likely that a part will be manufactured out of tolerance than from non-compliant material (this can be swapped, based on the history of your manufacturer).
Lastly, we have identified the controls in place that are intended to prevent the cause from happening in the first place. For the teeth shearing, we can see that material inspections and structural analysis are the current controls to prevent the use of bad material, as well as structural analysis to ensure that there is sufficient design margin.
In this instance, we are now saying that we believe we are more likely to detect a dimensional issue than we are a material issue. This is because functional gauges and dimensional inspections are very effective, while it’s possible for material and process variations to go undetected and pass on incorrect material data.
We can see that the RPN value is simply the product of the ratings (5*1*2), and that we are more concerned with the teeth shearing than with them slipping straight away. This is clearly because of the possible safety issue and will certainly need to be addressed. It is common for an organization to say that any RPN above a certain value, or with a severity of 5 or greater, must be addressed and reduced.
In the image below, we can see the completed FMEA, and we start to get a feel for what items we need to target first.

What Do We Do With This Data?
Now that we have the FMEA, what’s next? We should be looking at the items of most concern or above a certain RPN and working to resolve those issues. This may be through a redesign, more testing, additional inspection criteria, or something else that will help out.
In a full FMEA, these actions will be logged in the actual FMEA sheet. This is elaborated upon in the section below.
Further Reading
The lightweight FMEA is a great start, but in some organizations there are additional details that are filled out. Those details address the actions to be taken and their impact on the failure mode. Specifically, the new columns are as follows:
- Recommended Actions – These are the actions to be taken in order to reduce the RPN. Often, an RPN above a certain threshold will always require an action to reduce the rating in one or more of the three categories.
- Owner and Target Date – Each action will have an owner and a target date assigned.
- Actions Completed – This is where the specific actions are documented that were done in order to reduce the ratings.
- Updated SEV, OCC, DET – Another round of ratings are assigned to Severity, Occurrence, and Detectability, based on the results of the actions that have been completed. The goal of the actions is to reduce at least one of these categories to bring it within acceptable limits.
- New RPN – Similar to the prior RPN, this is the product of the updated SEV, OCC, and DET ratings. This should always be lower than the original RPN, or the actions taken provided little to no value.
Main Takeaways
Hopefully, this article has convinced you of the value in completing an FMEA for a new design or process. If you’re looking to minimize the amount of paperwork or effort in documenting your findings, a lightweight approach is a great way to do so. If you need to increase the scope of the FMEA into action and result tracking, then the further reading section should get you well on your way. To get started, download the free FEMA template here.