Time to read: 5 min
If you’ve worked with consumer electronics, you’ll have come across living hinges. They are found in a wide variety of components – clamshell packaging, attached bottle caps, and electronic cases, just to name a few.
They are low cost, easy to manufacture, and have little wear or friction involved in operation — understandably a popular choice! The idea is about as simple as you can get: a thin, flexible section of the same material used to build connecting parts of your product. But while the idea is simple, the execution can be more complicated.
Let’s take a look at some of the most important design, process and material considerations to help you get started.
Dimensions and Design
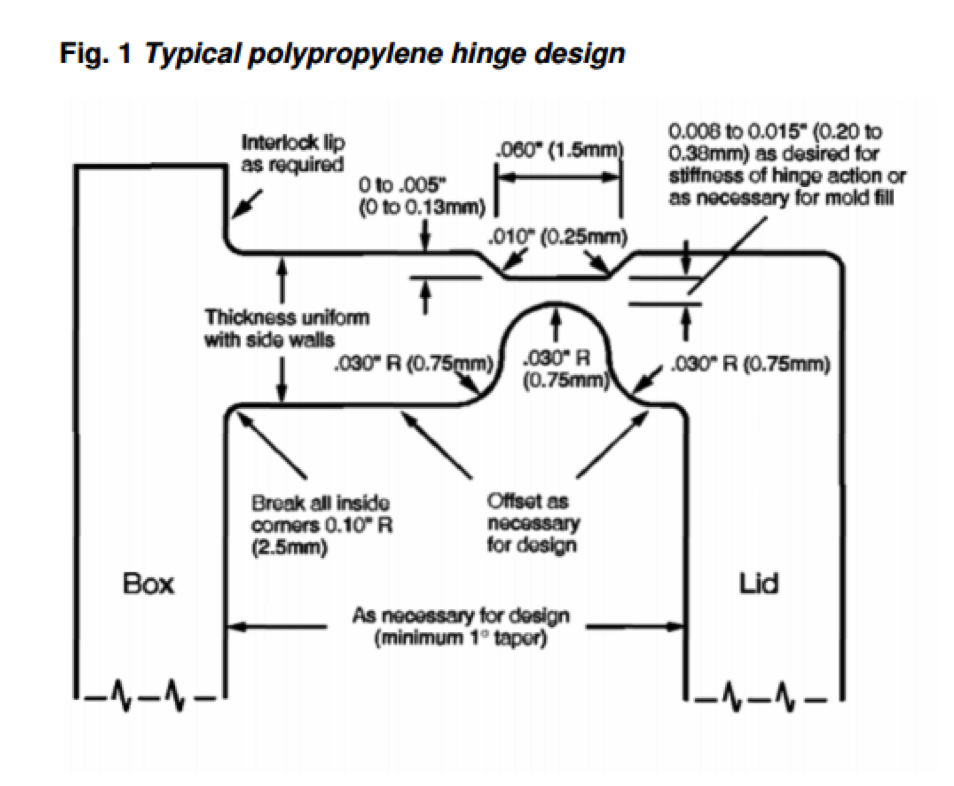
Since its introduction in the 1960s, the actual dimensions in living hinge design have changed very little. Fig 1 shows the standard polypropylene design used for injection molding.
6 Living Hinge Design Best Practices
1. Add Generous Radii
Generous radii improve flow through the hinge during molding and reduce stress concentration during use.
2. Include ‘Shoulders’
‘Shoulders’ on the part creates a flat recess. This both serves to make sure the hinge will bend in the center and that the part can deform enough for the hinge to have room to close.
3. Thin and Flexible is Best
A thicker hinge may appear more robust, but the greater elongation on the surface can cause the material to exceed its yield point, shortening the lifespan of the hinge. A thinner hinge is more flexible.
4. Divide Long Hinges
Hinges longer than 6 inches should be designed in two or more parts to improve hinge life.
5. Experiment with Thickness
The thickness of the hinge will change how stiff or sloppy the hinge feels to operate. You may have to experiment with more than one thickness to find what best fits your design.
6. Orientation Affects Strength
Orientation of the plastic molecules highly affects the strength of the joint and consequentially the hinge strength; the long plastic molecules should be perpendicular to the hinge whenever possible. It is possible to make viable hinges with parallel orientation (in the case of extrusion, for instance) if your design requires it, but you won’t be maximizing the strength of your material.
While it’s helpful to use the typical polypropylene design as a starting point, make sure to tailor this foundational design to your product’s specific needs.
Production Methods
Living hinges can be created in final production parts through injection molding and extrusion, with injection molding as the strongest method. For prototyping, 3D printing or urethane casting are both great options.
We’re going to take a look at each of these production methods and cover the best material options and important design considerations unique to each.
For quick-turn prototypes (3D printed parts in 24 hours), you can simply upload your files below for instant quotes in 3D printing and urethane casting.
Living Hinge Design for Injection Molding
Injection molding is the strongest way to build living hinges and great for production parts.
Best Material Option
Due to its toughness and ductility, polypropylene is the best material choice and a well designed, injection molded PP hinge can have an almost infinite service life reaching several million flexes.
Polyethylene is the second most common living hinge material with similar properties to polypropylene.
Design Tips
One of the most important design rules in injection molding is to maintain uniform wall thickness. In uneven walls, the different rates of contraction during cooling can cause residual stresses, warping and even breaking in your design.
However, when designing a living hinge you actually need to do the opposite by creating non-uniform walls, because for the hinge to be flexible it needs to be much thinner than the connecting rigid part.
Potential issues can be reduced or resolved entirely if you think carefully about where the gates in the mold will be placed. The full method for optimal gate placement can be found in the MIT Guide to Designing Living Hinges.
Note that immediately after molding, the hinge should be flexed a few times. This will cold-draw the plastic, greatly increasing its service life. A trick of the trade that simplifies tooling modification is to start with the flat section above the hinge having a depth of at least .015 inch and a hinge thickness of .006 inch”.
Living Hinge Design for Urethane Casting
Urethane casting is a great option for bridging the gap between prototype and production.
Best Material Option
Urethane resins are a huge family and come in hundreds of different properties. Manufacturers in different countries and states have different resins on hand, including some similar to polypropylene, the best material for living hinges.
Within the family of these PP-like materials, there is a tradeoff related to the durometer of the material — you can have rigid parts with a short-lived hinge or a flexible hinge and soft part walls. Some recommended materials are the Hapflex ™ 600 series, and BCCplastics BC8160 resin, specifically formulated for living hinge applications.
Your manufacturer may have other suitable resins in stock and should be able to help you choose one for your design.
Design Tips
When you cast in a polyurethane, the flow pressures are much lower than in injection molding, so a trade-off has to be made. The reduced pressures means the resin will flow less and so the hinge can’t be made as thin while still producing reliable parts.
Because of this, we recommend starting with a thickness slightly thicker than your injection molding design and choose a urethane in the low Shore D range. BJB FD-45 is a good place to start — Shore 45A, 735% Elongation, and castable.
As mentioned earlier, high durometer resins will retain part rigidity but give the hinge a limited life, while low durometer resins result in a more flexible hinge and softer part.
Living Hinge Design for 3D Printing
There are a lot of great options for prototyping hinges with 3D printing to test different thicknesses, placements and shapes. The resulting part won’t be as strong as an injection molded part, but should withstand enough flexes to properly test the component.
Best Material Option
When selecting the best 3D printing materials for living hinges, you should look for plastics with good elongation and flexibility. Nylon is a great option, for example.
Another great option is to prototype your part as a multi-material piece with a combination of VeroWhite and Rubber-like. Here’s a resource to help you prepare files for printing in two materials, giving you the functionality of a living hinge without sacrificing strength and resistance in the body if that’s crucial to your part’s performance.
Design Tips
When creating hinges in 3D parts, build orientation is very important. For the hinge to have maximum strength, the horizontal build plane should be perpendicular to the hinge direction.
Best results occur when the hinge thickness as at least twice the resolution of your print. Given that Nylon has a resolution of 0.254mm we recommend starting with 0.5mm as a minimum thickness.
Following these instructions should ensure your print gets at least 100 flexes in its testing cycle.

Main Takeaways
Designing living hinges can seem complicated at first, but once mastered can result in huge cost savings.
Where a traditional hinge could require several molding operations, an assembly operation, increased parts, and friction between parts causing wear, a living hinge can be made and included in your design in just one operation and the friction is reduced to nothing.
Invest in thoughtful design at the prototyping stage and you’ll save time, effort, and money when ready for higher volume production.
For further reading, check out these resources: