Time to read: 4 min
You’ve created a seamless design—structurally sound, sufficiently thick, and mindful of overhangs. However, you get your part back to find out that it’s not printable!
Many of the errors we see stem from how the digital model was created and often the main problems come down to whether the design was modeled using solid bodies or surfaces.
If you’re using a program like SketchUp that uses surface modeling, it can be tricky to make your 3D model printable, so I’m going to walk you through a few of the most common errors and show you how to fix them.
How to Check Your Models
First download netfabb Basic, a free program you can use to quickly verify designs.
In netfabb, you can identify watertightness issues, spot surface tessellation, and apply auto-repair, so this is an excellent tool to help you check your models for any errors.
3 Common Issues + Solutions
Issue #1: Zero Wall Thickness
With surface modeling, parts sometimes have walls that are infinitesimally thin. While they appear in the digital rendering, they can’t actually be printed and would not be present in the physical model.
Solution: Make sure every surface is enclosed so that the part is “watertight,” meaning the part won’t leak if theoretically filled with water. Also make sure the edges of each surface are connected—each edge should have 2 adjacent surfaces, no more, no less.
It’s best to go back to your CAD model and remove any free ends or extend it so that it connects with another free end.
You can also do this automatically in netfabb by clicking on the red plus-sign at the top to extend some ends for you. Then follow the steps to repair.
For more detailed instructions, here’s a video that goes through the common watertightness issues and shows you how to fix them:
The key takeaway here is to make sure all the surfaces are closed. And even if the surfaces appear closed and you are still having issues, go back through the design flow to double check!
Issue #2: Tessellation
While a contour may appear smooth in the CAD, depending on approximation settings, the surface might actually be approximated.
Let’s compare two designs side by side in netfabb:
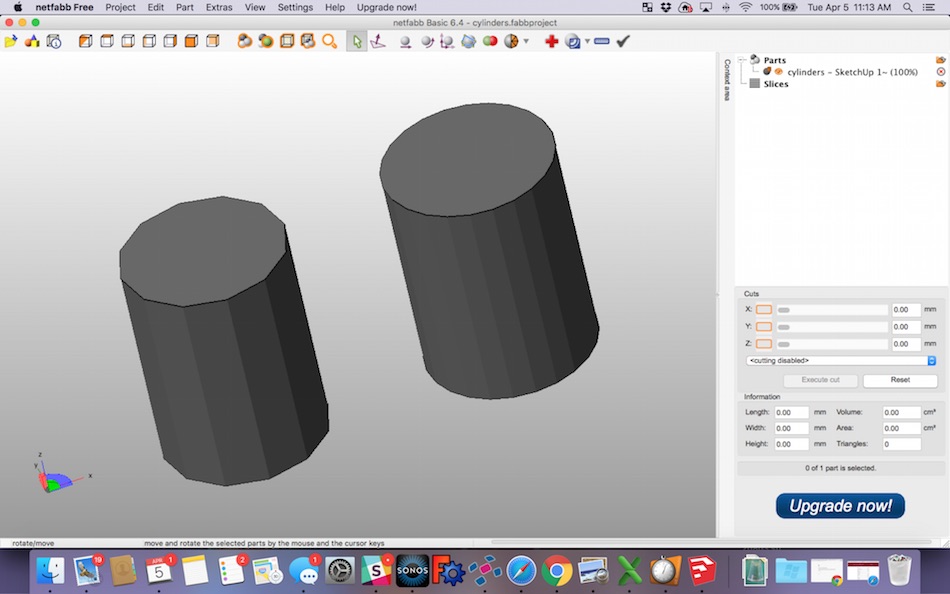
The cylinder on the left has some tessellation, so during print the surface might not appear as smooth. The cylinder on the right is much smoother.
(Note that for actual printing, make sure to separate the parts into different files. These two files are combined just for side-by-side comparison!)
Solution: In SketchUp, if you select <view> then check <hidden geometry>, you can see the approximation occurring for the curve. Change the number of segments on the curved surface to better approximate the contours.
Going back to SketchUp, we can see how these cylinders were designed:
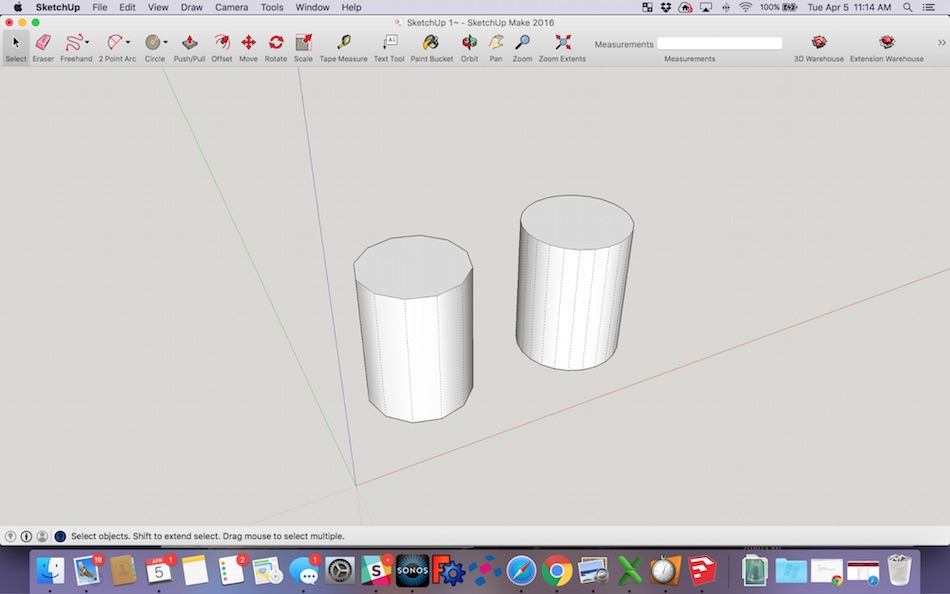
The cylinder on the left has 12 segments, while that on the right has 24.
In SketchUp, you will need to change the number of segments on a surface before any extruding or push/pull. To do so, draw the curve, then type “24s” for 24 segments, or “20s” for 20 segments.
When printing in lower resolution FDM, the surfacing issues might not be as apparent and thus might not matter as much. It will matter however when printing in high resolution materials such as VeroWhite, where the tessellations are something you should be aware of!
Issue #3: Scaling
Many architects or industrial designers working on larger products design life-size models but wish to scale down their parts for a scaled-model. It’s a great idea not only for proof of concept, but also for lower material costs or high resolution showcase work.
However, in scaling down, some features become too thin and are no longer printable.
Solution: Make sure to calculate required thicknesses for scaling! Thicken your features by such amount that once the part is scaled down, the walls meet our Minimum Wall Thickness criteria.
You can easily scale in netfabb by going to the toolbar at the top and selecting <part> <scale>, then entering the desired scaling. Once scaled, you can double check that there are no file errors due to scaling.
Use the measure tool to take another look at wall thicknesses if scaling down. If scaling up, just make sure that the dimensions fit on our build beds!
Here’s a video that walks you through the steps in more detail:
Main Takeaways
If you ever upload a file on Fictiv and we ask you to clean it up for printability, check one of these issues, as they are the most common in surface modeling.
The designs in most cases can definitely be printed, it’s just a matter of making sure each facet is completely defined so that going the design undergoes a seamless transformation from digital to physical.